free web tracker

Playing around with a stock 18-55 and a Sigma 70-300 ...
Now, with an SMC Takumar 105 and a CZJ Flektogon 35 too ...

Sunday, December 11, 2011

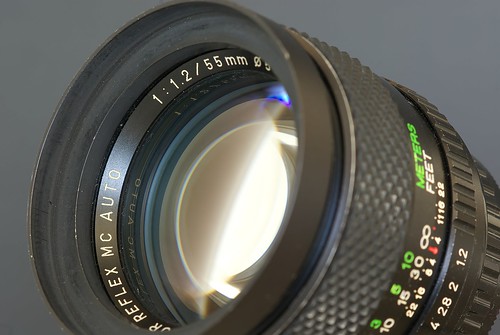
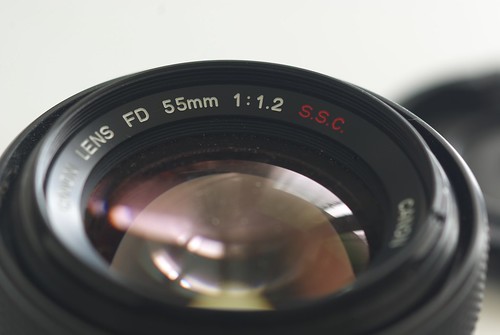
Cleaning from fungus: Canon FD 55 f/1.2 SSC

After a little absence because of my new sport activity, i'm back with a new cleaning tutorial. The patient awaiting for disinfection and cleaning is a nice Canon 55mm f/1.2 SSC, in FD mount.

Cleaning a Canon FD 55 f1.2 SSC - 01 - _IGP6165


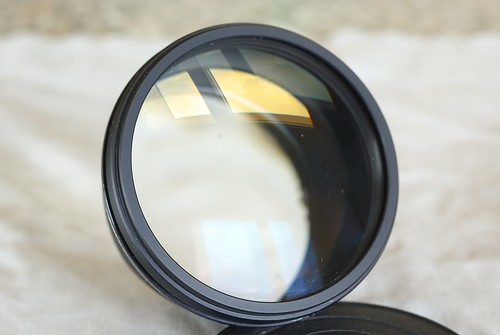
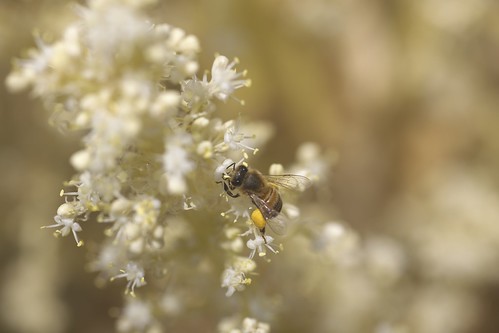
Although i neglected to take a picture of the infection, the fungus has spread around the inner border of the front element (at least). The molds are quite light, the infection is just at the beginning, so, let's start with the cleaning sequence ...

But, before going on, the classic legalese disclaimer:

AS USUAL, I CANNOT BE HELD RESPONSIBLE IF YOU DESTROY YOUR LENS DOING WHAT I EXPLAIN HERE. IT WORKED FOR ME, IT DOESN'T MEAN THAT IT WILL WORK FOR YOU. THIS IS A VALUABLE LENS, THUS CONSIDER THE SERVICES OF A PROFESSIONAL REPAIRMAN BEFORE TRYING TO FIX IT ...


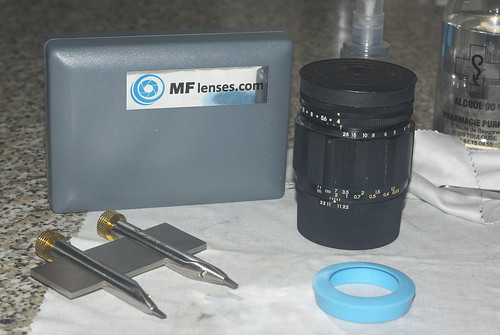
What you will need to clean the infection:
  • A sink cap, to remove the front name ring.
  • A spanner wrench (got mine from MFLenses). You can get yours wherever you want, but avoid cheap ones (less than 50€).
  • Some q-tips (the brand doesn't matter).
  • Cold cream. I use Avene's one, but simply because it is really cheap in France. Ask to your beauty-shop (or to your wife) what they have available.
  • Zippo fluid or isopropyl alcohol or something similar, to remove the cold cream from the lens.
  • Optical cleaning fluid for the final cleaning of the lens.
  • A microfiber cloth, to clean the lens.
  • A clean workplace and ... some patience ;-) ...

Now, let the game begin ;-) ...

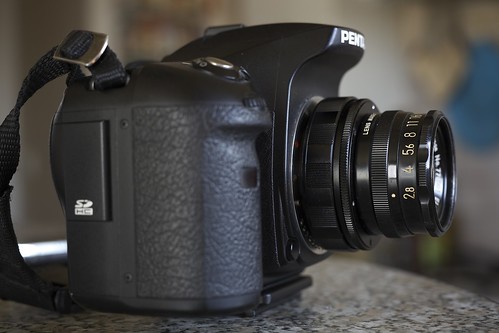
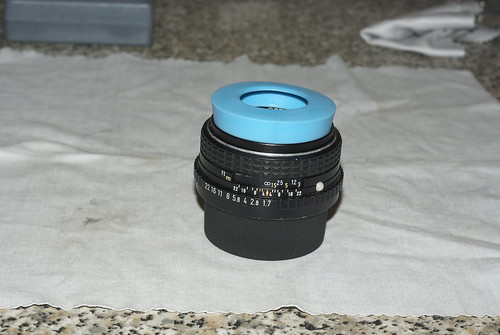
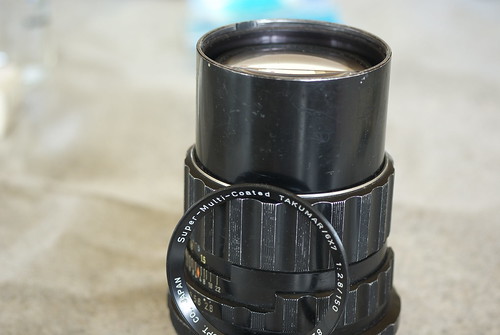
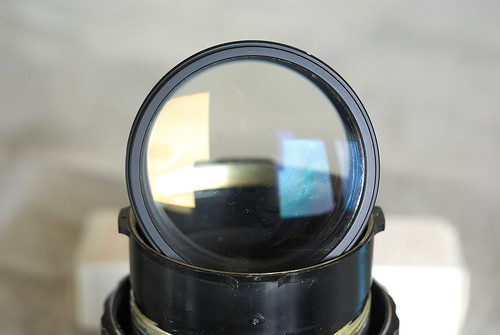
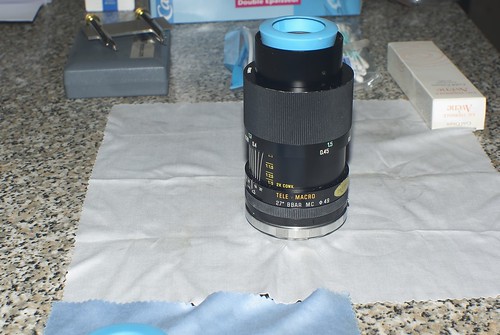
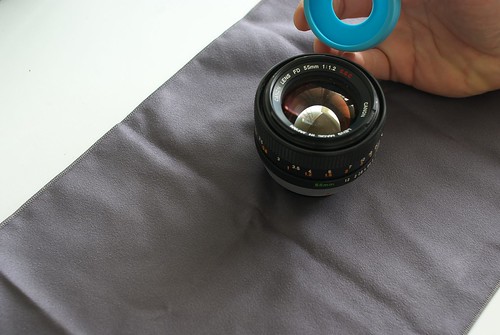
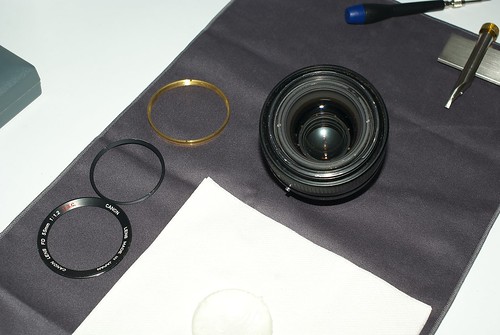
Start by focusing the lens at the infinity and set the diaphragm ring at full aperture. Then, put your lens on a fiber cloth, it will help to avoid thingies rebounding (you never know). Finally, using the sink cap, unscrew the front name ring.

Cleaning a Canon FD 55 f1.2 SSC - 02 - _IGP6174

Cleaning a Canon FD 55 f1.2 SSC - 03 - _IGP6176

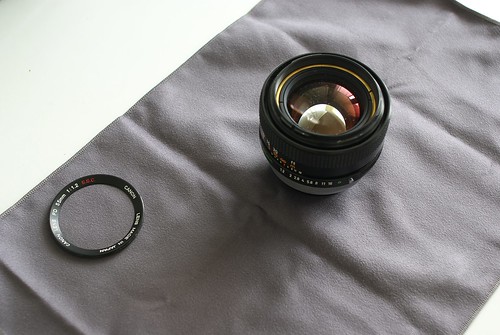
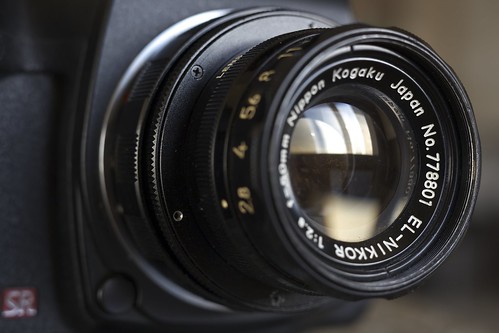
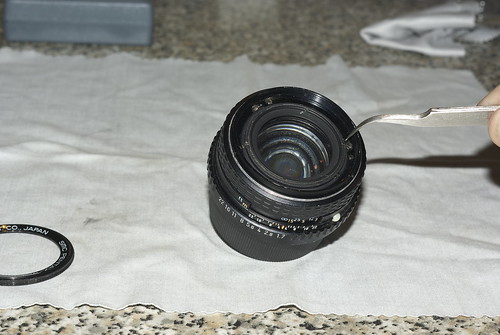
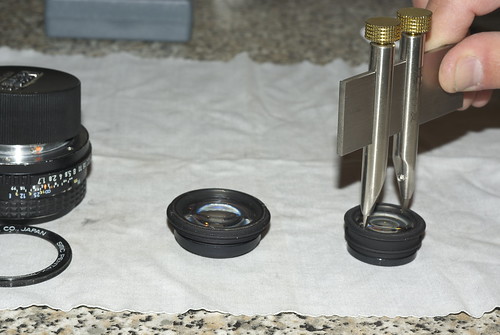
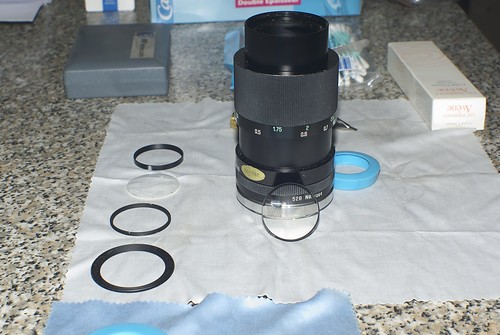
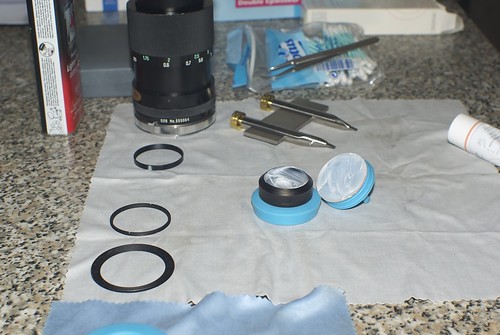
Once the name ring is unscrewed, notice the three rings that will show up:

Cleaning a Canon FD 55 f1.2 SSC - 04 - _IGP6181

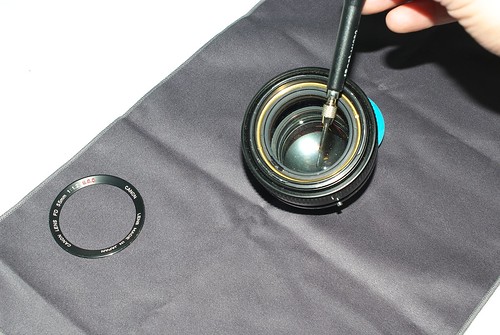
Let's start by removing the inner one (pointed out by the screwdriver in the picture above), since is the one that holds in place the front element. Trim the spanner wrench to the right width and carefully unscrew the inner ring:

Cleaning a Canon FD 55 f1.2 SSC - 05 - _IGP6182

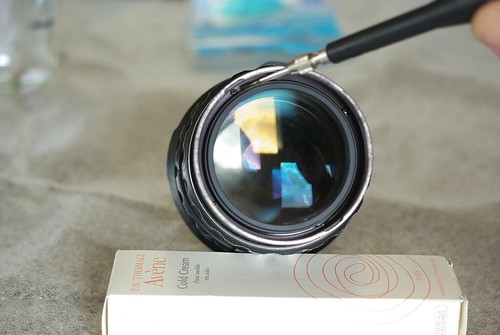
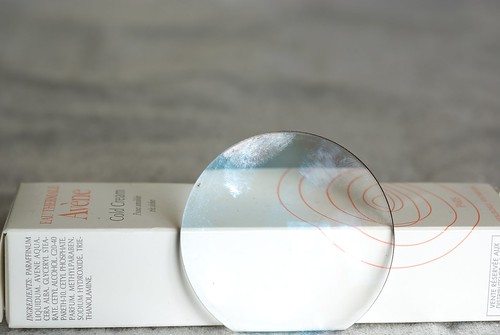
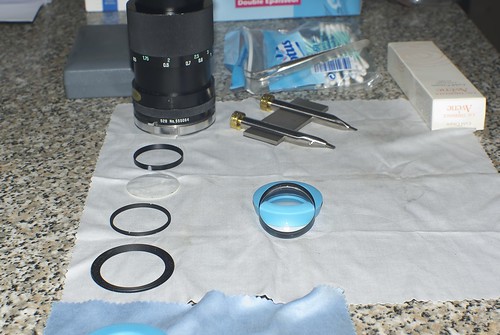
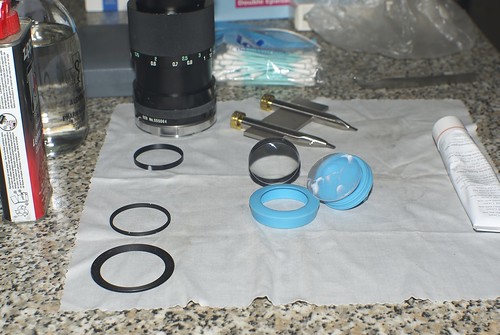
Once the inner ring is unscrewed, carefully remove the front element from the lens and prepare the cold cream.

Cleaning a Canon FD 55 f1.2 SSC - 06 - _IGP6185

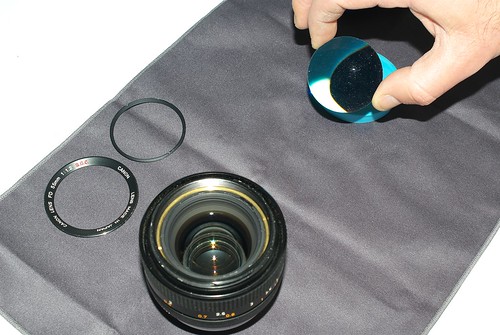
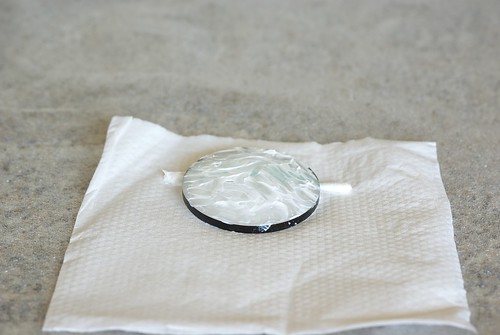
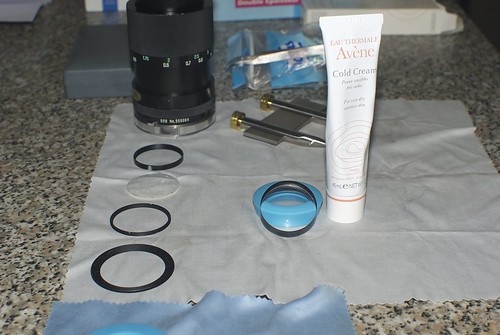
Using a q-tip, spread the cold cream on both sides of the lens and let it dry until the cream becomes translucent (about an hour).

Cleaning a Canon FD 55 f1.2 SSC - 07 - _IGP6192

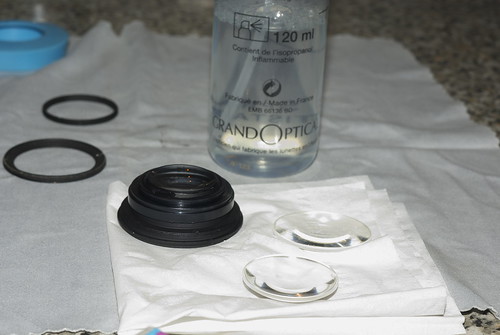
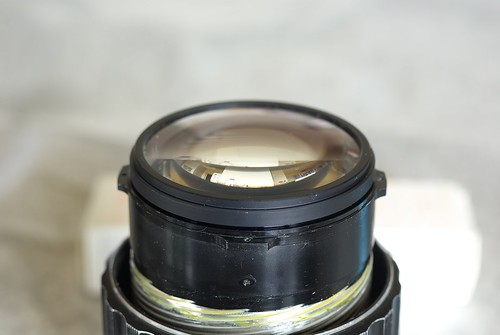
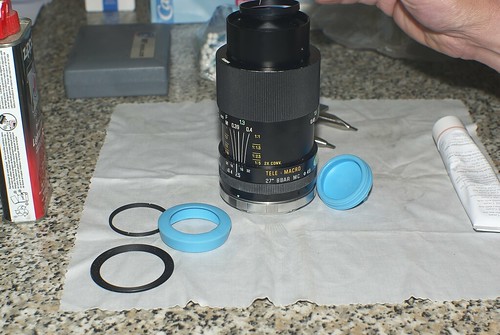
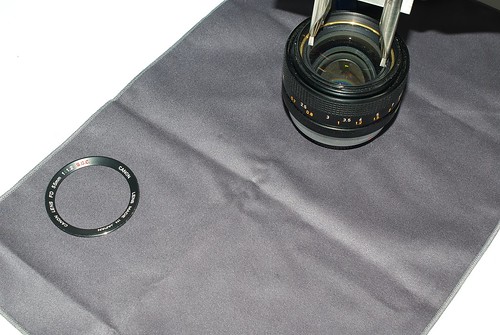
After a thorough inspection, i noticed some fungus molds on the next element (in fact, a doublet cell), so i unscrewed the cell (inner ring) and the retaining ring of the filter thread/hood holder (outer brass ring).

Cleaning a Canon FD 55 f1.2 SSC - 08 - _IGP6194

Cleaning a Canon FD 55 f1.2 SSC - 09 - _IGP6197

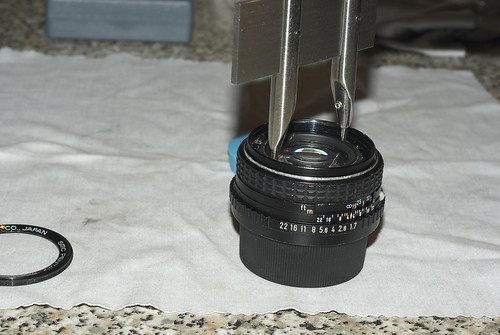
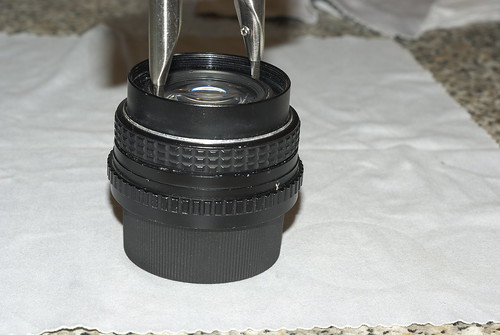
The optical cell has been removed from the lens barrel. If you are in need to clean the diaphragm blades too, this would be the right time. Luckily (for me), they are clean and snappy ...

Cleaning a Canon FD 55 f1.2 SSC - 10 - _IGP6198

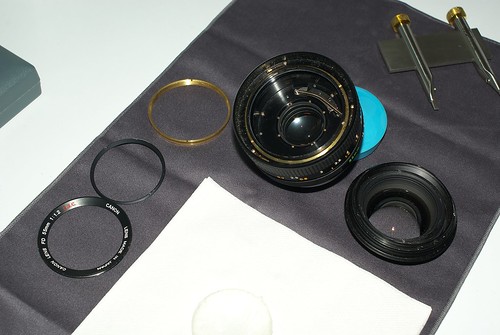
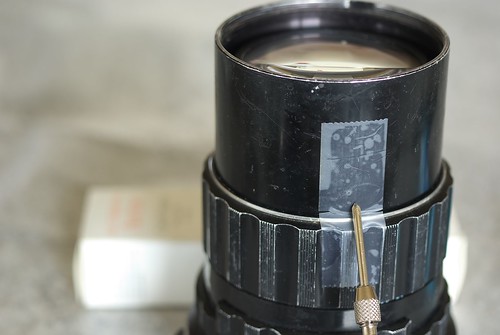
The optical cell is held in place by a retaining ring on the rear of the optical group. Unscrew it, being careful to the small spacer inside (the white ring on the picture below.

Cleaning a Canon FD 55 f1.2 SSC - 11 - _IGP6200

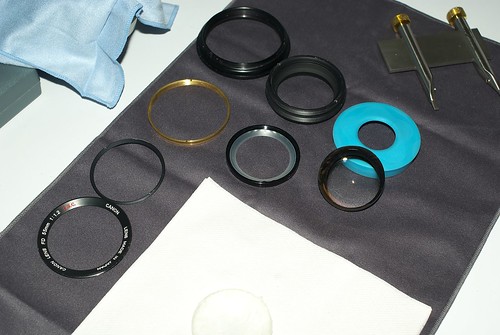
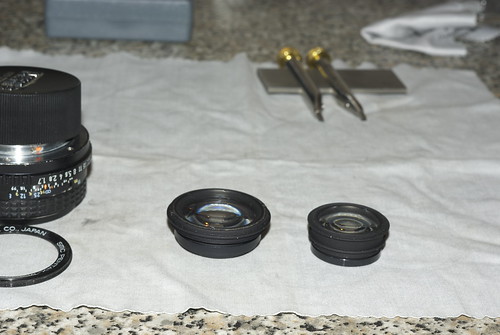
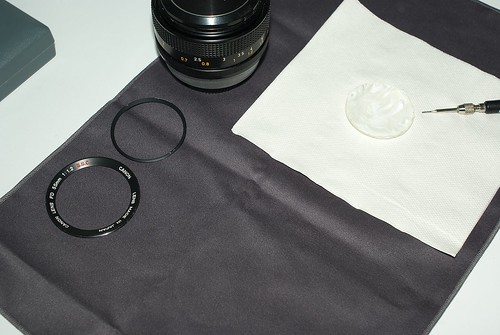
Using another q-tip, spread the cold cream on both faces of the doublet and let it dry as for the front element.

Cleaning a Canon FD 55 f1.2 SSC - 12 - _IGP6201

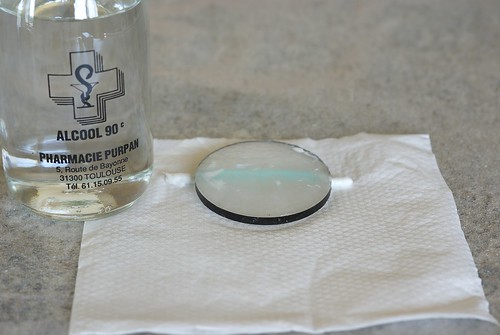
Once the cold cream has dried, remove it using either some Zippo fluid or some isopropyl alcohol, then finish cleaning the lenses using your preferred optical fluid.

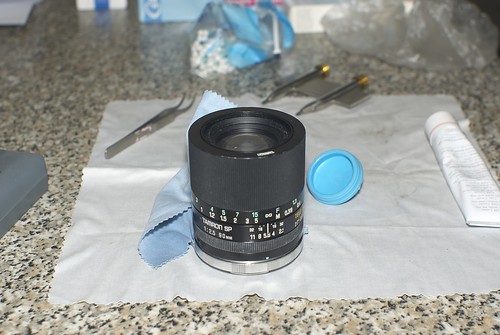
To rebuild the lens, just follow the steps above in reverse order and you are done ;-) ...

Cleaning a Canon FD 55 f1.2 SSC - 13 - _IGP6202

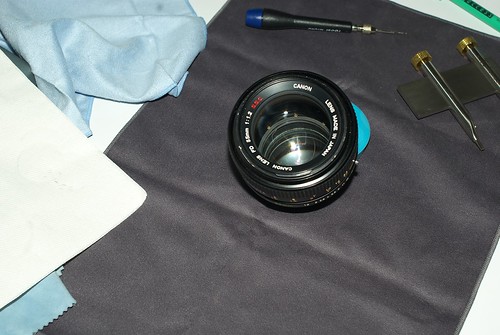
This fine lens is ready for its next assignment :-) ...

And no, before you ask, it's not mine and i don't have an FD camera to play with it, thus no sample pictures taken with it ...

Hoping that this will be useful to someone ...

Labels: ,

Saturday, October 1, 2011

SMC Pentax-A 100 f/2.8 Macro: Some samples ...

A few months ago i borrowed this lens from a friend of mine, to take some sample pictures to sell it (he doesn't have a Pentax body for testing).

As soon as i mounted the lens on the camera, i was disappointed, as i discovered that the camera was unable to control the diaphragm of the lens. After a simple inspection, i discovered that the electrical contact for the auto operations on the mount was missing ...
But, since i don't use this contact to take pictures, i decided to try it anyway, using it in stop down mode through the green button on the camera ...

The lens has revealed to be really easy to focus, thanks to its excellent contrast and to the long throw of the barrel (it goes down to 31cm, to achieve the 1:1 reproduction ratio). Although quite heavy (half the weight of my K10D), it balanced quite well on the camera. The exposure has been a bit tricky since, being seen as an M42 lens by the camera, i have been forced to use the spot metering in conditions where another kind of metering would have been more useful. Anyway, shooting raw has allowed an easy correction of the overexposure ...

Here are some sample shots. mostly taken wide open:

SMC Pentax-A 100 f2.8 Macro - _IGP4008


SMC Pentax-A 100 2.8 Macro - _IGP3950


Porst Color Reflex MC Auto 55 f1.2 - _IGP4263

This last picture has been taken probably at f/5.6 or f/8.


Definitively, this lens renders a bit better than my Kiron 105 macro and it has a better native contrast too (thus, focusing more easy) ...

My impressions:
  • Although this lens is not really compact as my other 100mm, it balances quite well on my K10D and is easy to handle (medium-sized hands).
  • The excellent contrast and the long throw, coupled with the reduced DOF of a 100mm lens, make focusing quite easy. But for sure, it is not suited for action shots ...
  • The lens is fully usable starting wide open. Sharp enough across the whole (APS-C) frame and with a nice bokeh.
If you want to see more sample pictures at full resolution, the set is available on my Flickr photostream clicking here ...


For the technical fans, here are the technical data of the lens:

Lens name: smc PENTAX-A MACRO 1:2.8 100mm
Production: 1985 to 1989 (approx.)
Optical formula: 7 elements in 7 groups
Aperture blades: 8
Minimum focusing distance: 0.31 m
Maximum reproduction ratio: 1:1
Filters thread: 58 mm
Weight: 470 g

Labels: ,

Friday, June 24, 2011

M42 Focusing Helical

My quest for photographic accessories has leaded to a nice M42 focusing helical. Since i had some "spare" enlarger lenses available and didn't want to go out with a bellows on my camera, i finally decided to buy one following the advice of Calvin from MFLenses.

The helical i bought is an M42-to-L39 type, with an L39-to-M42 ring on the rear side, so that i'm able to use it on both my DSLRs (and, eventually, on a future rangefinder too). It extends from about 15.5mm up to 29mm. Not too much, but enough for what i was thinking to do first with it (playing with my 50mm enlarger lenses).

Out of the box, the helical and the accompanying L39 adapter look really fine, with a nice black finish. Of course, i tested at first the helical without mounting it on the camera. Although not as smooth as a Takumar lens barrel, the rotation of the helical is fluid across the whole range but it requires a bit more strength to rotate wrt a good Takumar. Not so bad: since i'm planning to use it for macro shots, i like the idea of a focusing barrel that doesn't rotate too easily ...

Then i grabbed my M42-to-EOS adapter (bought from Calvin too, by the way) and my original M42-to-PK ring. The helical has screwed in without any issue, the M42 threads are perfectly matching on both adapters.

Finally, mounted on the camera, here is how it looks like with an EL-Nikkor 50/2.8:

Focusing Helical - _MG_4752


Focusing Helical - _MG_4753


As a free gift i got also an M32-to-M42 adapter ring, which perfectly fitted my Taylor-Hobson Ental 80/4.5. Here you can see how it looks on my EOS 5D Mark II:

Focusing Helical - _IGP5400


As a side note: as you can see on the picture, the front face of the adapter is held in place by three Phillips screws. Spread across the whole circumference, there are three more holes, too small for screws, whose usage is unknown to me ...

My conclusions: if i was first thinking that this helical was a good piece of mechanics, now i am even more satisfied with it, because i can play with all my enlarger lenses including my T-Hs ;-) ...

The cons: i'm planning to buy the two bigger versions of this helical, too ...

Labels: ,

Wednesday, June 8, 2011

Cleaning from fungus: SMC Pentax-M 50 f/1.7

Going on with the lens rescue series, an SMC Pentax-M 50/1.7, one of the best Pentax lenses, is the new patient.

As you can see here, back-lighted by a LED flashlight, a fungus has widely infected the lens.

01 - _IGP5471


Since the fungus will reveal to have infected all the elements in the lens, a fully elements removal is required. As usual, before going on, the classic legalese disclaimer:

AS USUAL, I CANNOT BE HELD RESPONSIBLE IF YOU DESTROY YOUR LENS DOING WHAT I EXPLAIN HERE. IT WORKED FOR ME, IT DOESN'T MEAN THAT IT WILL WORK FOR YOU. THIS IS A VALUABLE LENS, THUS CONSIDER THE SERVICES OF A PROFESSIONAL REPAIRMAN BEFORE TRYING TO FIX IT ...


What you will need to proceed:
  • A sink cap, to remove the front name ring.
  • A spanner wrench (got mine from MFLenses). You can get yours wherever you want, but avoid cheap ones (less than 50€).
  • Cold cream. I use Avene's one, but simply because it is really cheap in France. Ask to your beauty-shop (or to your wife) what they have available.
  • Zippo fluid or isopropyl alcohol or something similar, to remove the cold cream from the lens.
  • Optical cleaning fluid for the final cleaning of the lens.
  • A microfiber cloth, to clean the lens.
  • A clean workplace and ... some patience ;-) ...

Now, let's start the game ;-) ...

Focus the lens to the infinity first, for easy removal of the rear optical group, then unscrew the front name ring and remove it.

02 - _IGP5490


Notice here the two concentric retaining rings with notches for a spanner wrench exposed.

03 - _IGP5491


Engage the outer one with the spanner wrench and unscrew the whole front optical group.

04 - _IGP5492


Reverse the lens. You will notice here too two concentric retaining rings with notches for a spanner wrench. And here too, engage the outer one with the spanner wrench and unscrew the whole rear optical group.

05 - _IGP5494


Let's start with the front cell. Unscrew the retaining ring of the front element.

06 - _IGP5474


Notice the inner retaining ring exposed. Engage it with the spanner wrench and remove the second element of the front optical group.

07 - _IGP5478


Unscrew the retaining ring of the rearmost element and remove the lens from the rear optical group.

08 - _IGP5495


Now you have separated all the five elements of the lens. Using a Q-tip (or the like), spread some cold cream on the lenses.

09 - _IGP5477


After about an hour, remove the dried cold cream with either Zippo fluid or isopropyl alcohol (i had the last one available).

10 - _IGP5481


Then, clean the lenses with some optical fluid.

11 - _IGP5482


Almost done. Rebuild both the front and the rear optical cells and screw them back in the barrel. Last, screw in the front name ring.

12 - _IGP5483


13 - _IGP5499


Time to enjoy the freshly cleaned SMC Pentax-M 50 f/1.7. A picture of the lens that has been used to take the previous pictures and a portion of the surgical team.

14 - _IGP5502


That's all, folks!

Hoping that this will be useful to someone ...

Labels: ,

Friday, May 13, 2011

Cleaning from fungus: SMC Takumar/6X7 150 2.8

Hi all,

My assignment for my second MF lens cleaning has been an SMC Takumar 150 f/2.8 for a Pentax 6x7, left to my care from one of my preferred sellers at the Toulouse monthly flea market. The lens is built according to the usual standards of the Takumar lenses, with a full-metal barrel, and is a huge piece of glass and metal.
Whereas the barrel shows signs of usage, the diaphragm is working fine and the glass is clear ... except for some fungal molds around the border of the front lens:

01 - _IGP5323


Thus, i was assigned by the owner of the lens to rescue the eye of his new camera, a nice Pentax 67 ... Now, before going on, the usual legalese disclaimer:

AS USUAL, I CANNOT BE HELD RESPONSIBLE IF YOU DESTROY YOUR LENS DOING WHAT I EXPLAIN HERE. IT WORKED FOR ME, IT DOESN'T MEAN THAT IT WILL WORK FOR YOU. THIS IS A VALUABLE LENS, THUS CONSIDER THE SERVICES OF A PROFESSIONAL REPAIRMAN BEFORE TRYING TO FIX IT ...


What you will need to proceed:
  • A sink cap, to remove the front name ring.
  • A precision Phillips screwdriver (mine is made by iBost). Avoid cheap ones.
  • A spanner wrench (got mine from MFLenses). Here too, avoid cheap ones (less than 50€).
  • Cold cream. I use Avene's one, but simply because it is really cheap in France. Ask to your beauty-shop what they have available.
  • Zippo fluid or isopropyl alcohol or something similar, to remove the cold cream from the lens.
  • Optical cleaning fluid for the final cleaning of the lens.
  • A microfiber cloth, to clean the lens.
  • Some adhesive tape.
  • Surgical gloves, to avoid leaving your fingerprints on the lenses.
  • A clean workplace and ... some patience ;-) ...

Now, let's start the game ;-) ...

Here the only affected lens is the front one, so start by removing the front name ring, with the help of a sink cap (or another proper tool):

02 - _IGP5325


Careful here: despite what has been done on other lenses, the front ring is not screwed on the filters thread, but it is screwed on an inner thread. Thus be careful to not engage the outer border of the name ring in the filters thread, otherwise the ring may get stuck (as happened to me). If this happens, gently screw in a bit the ring until it gets disengaged, then restart unscrewing it again, using only two fingers at 180° on the front ring.

03 - _IGP5327


Removing the name ring exposes four Phillips screws, spread every 90° between the front cell and the outer barrel:

04 - _IGP5328


These screws keep the barrel in place. Removing them is not really required but, to keep the intervention easy, i preferred to remove them to remove the outer barrel.

So, before removing the screws focus the lens at its shortest distance and stick some adhesive tape on both the barrel and the focusing ring, to be used as a position marker for later use:

05 - _IGP5329


Then, remove the four screws and slip out the outer barrel from the lens:

06 - _IGP5330


Now, the whole front cell is exposed and may be removed from the lens.

Looking at the cell body, you can notice two notches for a spanner wrench so get one and unscrew the front cell from the lens (you can check the pictures on my Flickr photostream, they have explicative notes on them):

07 - _IGP5331


To remove the front element from the cell, unscrew the front retaining ring and then, when you remove the lens you can ear a light suction sound: the manufacturing tolerances are really strict ...

08 - _IGP5332

Here is the lens evil incarnation, a fungal infection across the whole border of the lens:

09 - _IGP5336


As usual, my preferred lens cleaner, Avene's Cold Cream, now comes to rescue. Using a q-tip spread some cold cream on both surfaces of the lens and then wait about an hour for drying ...

10 - _IGP5338


After about an hour (i spent mine playing an online shoot-them-up game ;-) ) remove the dried cream with some 90° alcohol or Zippo fluid (both works great, the choice is up to what you have available):

11 - _IGP5339


Once cleaned with the alcohol and some optical fluid, the freshly cleaned lens may be mounted again on the cell. Here it is:

12 - _IGP5344


Now, screw in back the front cell on the lens barrel:

13 - _IGP5346


The outer barrel simply slips in. Verify that the lens is still focused at its shortest focusing distance and use the adhesive tape check-mark to verify the alignment of the barrel and the lens body (to be sure that the screws holes and threads on the lens body are properly aligned):

14 - _IGP5349


Last, screw in the four screws (a magnetized screwdriver is really helpful here) and put back the front name ring. The lens is now ready for its next assignment:

15 - _IGP5353


The full resolution annotated pictures are available in this set from my Flickr photostream.

Hoping that this post can be of help to someone other, your comments are always very welcome ...

Labels: ,

Sunday, April 24, 2011

Cleaning haze: Tamron SP90 f/2.5 (52B) ...

Being a rainy day, i decided to spend some time cleaning a lens of my preferred seller, a Tamron SP90/2.5 Macro (the 52B model, with a 49mm filters thread) ... The lens was affected by some kind of internal haze and some strange internal reflections, which made me almost skeptical about the success of the operation (read why at the end of this post)...

01 - Tamron SP90 Fix - _IGP5301


Do you want to know more ? If no, then you can fly away from this page. If yes, then continue reading, but before:

AS USUAL, I CANNOT BE HELD RESPONSIBLE IF YOU DESTROY YOUR LENS DOING WHAT I EXPLAIN HERE. IT WORKED FOR ME, IT DOESN'T MEAN THAT IT WILL WORK FOR YOU. THIS IS A VALUABLE LENS, THUS CONSIDER THE SERVICES OF A PROFESSIONAL REPAIRMAN BEFORE TRYING TO FIX IT ...

So, after the legalese, let's start the game ...

Since the haze seems to be between the first two front elements, start by unscrewing the front ring using a sink cap:

02 - Tamron SP90 Fix - _IGP5302


Once the front ring removed, you will notice two concentric rings with notches for a spanner wrench. The ring to remove now is the inner one (if in doubt, check the picture on the Flickr photostream, it has notes on it):

03 - Tamron SP90 Fix - _IGP5304


After removing the retaining ring, CAREFULLY turn the lens upside down: the front element, a spacer ring and a cemented element will slip away from the barrel:

04 - Tamron SP90 Fix - _IGP5305


Here an almost missed shot. I should have switched to a macro lens, to show the haze and a nice fingerprint, probably left by the previous repairman who serviced this lens. Instead, i just took a picture of the elements to clean (grin!) ...

05 - Tamron SP90 Fix - _IGP5306


Being my first cleaning from haze, i didn't know how to attack it, so i started with the usual fungus removal tool, some Cold Cream:

06 - Tamron SP90 Fix - _IGP5309


Since i had to wait some time, i decided to clean the front element too:

07 - Tamron SP90 Fix - _IGP5312


After about half an hour, time to check if the cold cream worked for the haze ... Thus, i removed the dried cream with some Zippo fluid and a q-tip:

08 - Tamron SP90 Fix - _IGP5313


Great surprise, the cell was clear, no more haze or fingerprint :-) ... And yes, i know that i should have taken a macro shot here ...

09 - Tamron SP90 Fix - _IGP5314


After cleaning the front element, CAREFULLY slip in the cemented cell first and the spacer ring after, using some tweezers for the spacer ring (damn framing):

10 - Tamron SP90 Fix - _IGP5315


Finally, after about an hour, the lens is ready for some action:

11 - Tamron SP90 Fix - _IGP5319


The lens was entrusted to me with a Canon EOS third-party adapter mount. Since i didn't have a spare  Pentax-K Adaptall mount for testing, i decided to test the lens on my 5D Mark II ...
A first shot with the lens wide open, at f/2.5:

12 - Tamron SP90 Fix - _MG_9579


Then, another one at f/4:

13 - Tamron SP90 Fix - _MG_9580


I didn't rely too much about the success of the cleaning, but the results are worth the effort ...

Footnote for the curious readers: some haze on inner cells of a lens, typically on cemented cells, denotes a beginning of flaws in the cementing glue. Usually, this kind of damage may be easily fixed by a professional repairman, who has to separate the elements, remove the glue, clean the elements, then realign and glue them again. When i first saw the haze, i was thinking about this kind of flaws, which i'm not able to fix for different reasons (notably, lack of specialized hardware). Nevertheless, i warned the owner of the lens about the possible failure of the cleaning ...
Luckily, the haze has revealed to be a kind of surface moisture (because of a previous bad cleaning ?), which has been easily removed by the cold cream. In the case of a cement flaw, all this would have been useless ...

Again, do not hesitate to ask the services of a professional repairman for servicing this kind of valuable lenses, they are really worth the money ...

Last minute editing: another sample shot at f/4, during a "field test" at the Jardin des Plantes in Toulouse.

Tamron SP90 f2.5 Macro 52B - _MG_9917

If you want to check the full resolution sample pictures, taken with my 5D MarkII, feel free to browse this set from my Flickr photostream.

Labels: , ,